Stripes!
It has been too long since I have been posting regularly, opps. But I am finally back with a wonderful how-to and one of the many reasons I’ve been so busy lately.

Now, if you know me at all, you know that I LOVE stripes. I wear them weekly, we have them all over our home, and they often appear in my designs. But ever since our house was completed last summer I have been dying to have some as an accent wall in our home. But with all of our walls being textured, it seemed like a very big, time consuming, tedious problem. Although I do have a generally steady hand, and perfectionist eye, I was not about to hand paint or touch up stripes on an entire wall. So I started doing some digging, and came across this amazing how-to.
So excited I could hardly contain it I grabbed a gallon of paint that weekend and the recommended tape in the post and got to work.
But did it work? Yes!
Well, eventually…
It all looked so easy, and the instructions were great, but after following all of the steps perfectly, I peeled off my tape with great expectations to see tons of bleeds all down the line. Bummer!
So with the help of my genius husband and a bit of trial and error here are a few notes I would add in case any of you are hoping to tackle a similar project.
First of all, I did really like the tape they recommended. It seemed slightly thinner than the regular blue or green tape and allowed me to press it down a bit easier, but overall I don’t think it is a deal breaker. By the time the process is complete you could probably get away with using just about any tape.
So, what caused mine to bleed and hers to look fabulous? Possibly difference in our wall textures, but most likely I think it was my assumption of how much paint was needed in the foam brush step (#4). I did everything just as she described, but boy were there gaps under my tape. Even with the finger pressing the tape did not adhere to the textured wall very well and sponging on the paint in what I considered a normal even coat offered no help. In order to really fill the gaps we followed steps 4-5, repeating this process 2-3 times per stripe, until the barrier of base paint color was extremely thick and completely filled any gap that you could see remained under the tape.
Once this step was done, I thought “Great! Hard part over, now I can just roll on my accent color and peel the tape!” Wrong.
In order to get really crisp lines I had to do the same technique with the foam brush as before, only this time covering over what I had just done with the accent color (dark gray). This time using a much lighter more even coating and constantly pulling outward from the stripe. I found that rolling the paint on opened up some of those gaps and it still bled through in some spots. We think the key here is really the outward motion of applying the paint away from the stripe, never pushing paint towards the tape line, but always moving it away from the line.
Finally, after several hours of measuring, taping, and dabbing on paint, I peeled the tape off while the paint was still wet and my lines were truly perfect!
I’m not saying all this to scare you away. I completed this project in 2 days, and it probably took about 10 or so hours to complete with all the trial and error, but every day when I walk into my bedroom and see our wall I am filled with joy and a smile on my face. It was all totally worth it.
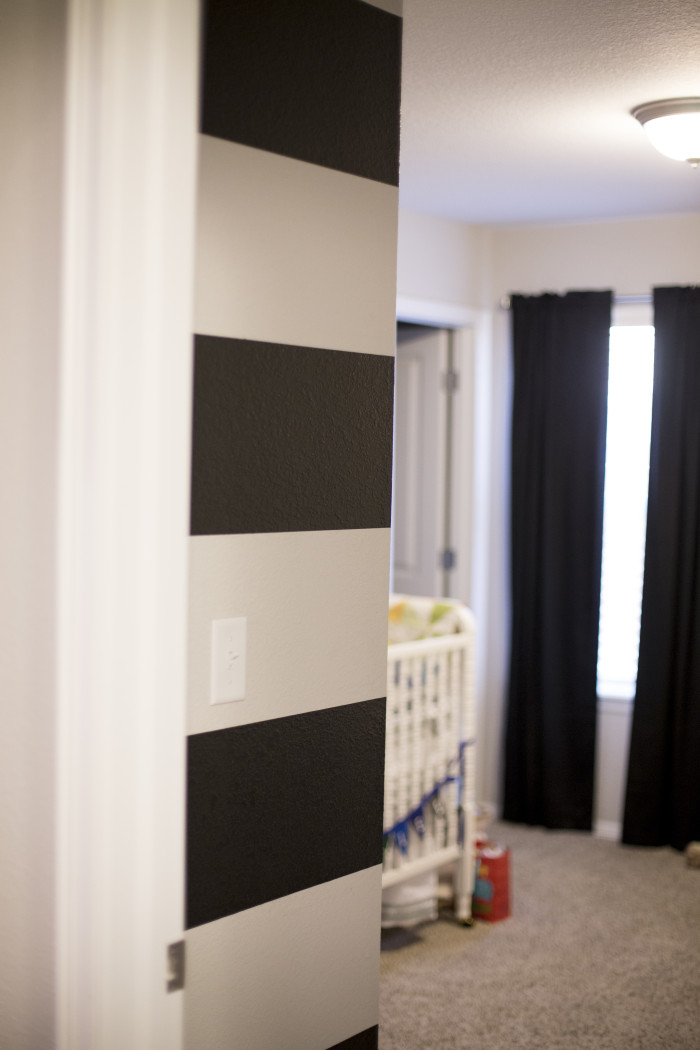
And a couple weeks later I tried again on a much smaller wall with horizontal stripes in my sons room, and they came out perfectly crisp and things went much, much faster. I completed his wall in only a couple hours time following the above process and as I pass it every day I just love the accent.
We have since used this process for all painting, including trimming around our house, making all of our lines completely crisp and sharp, and it really is quicker and more efficient than getting out those pesky trim brushes and praying your hand is perfectly steady while you trim along the baseboards and ceiling.
Comment