Apr. 4, 2014
Update: To purchase aspects of this theme, please visit my Etsy Shop!
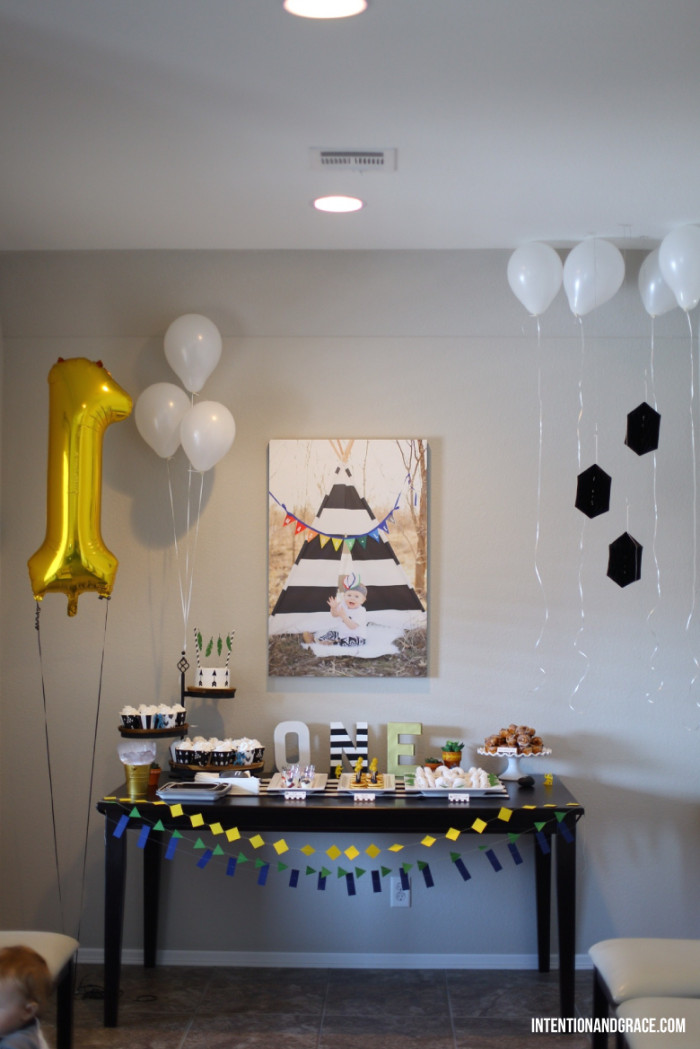
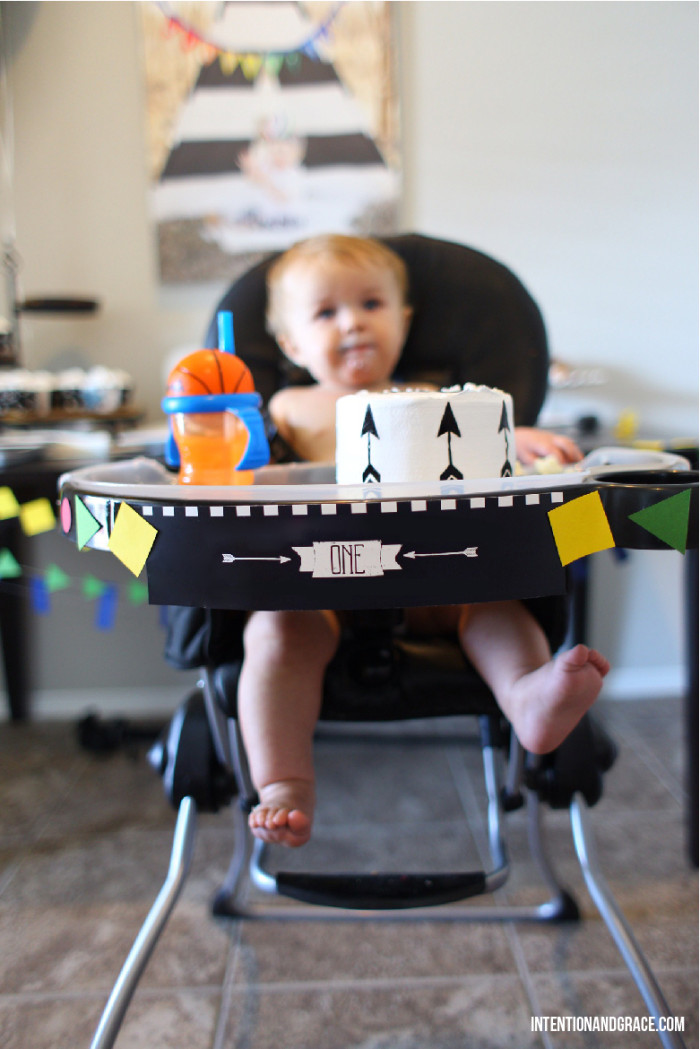
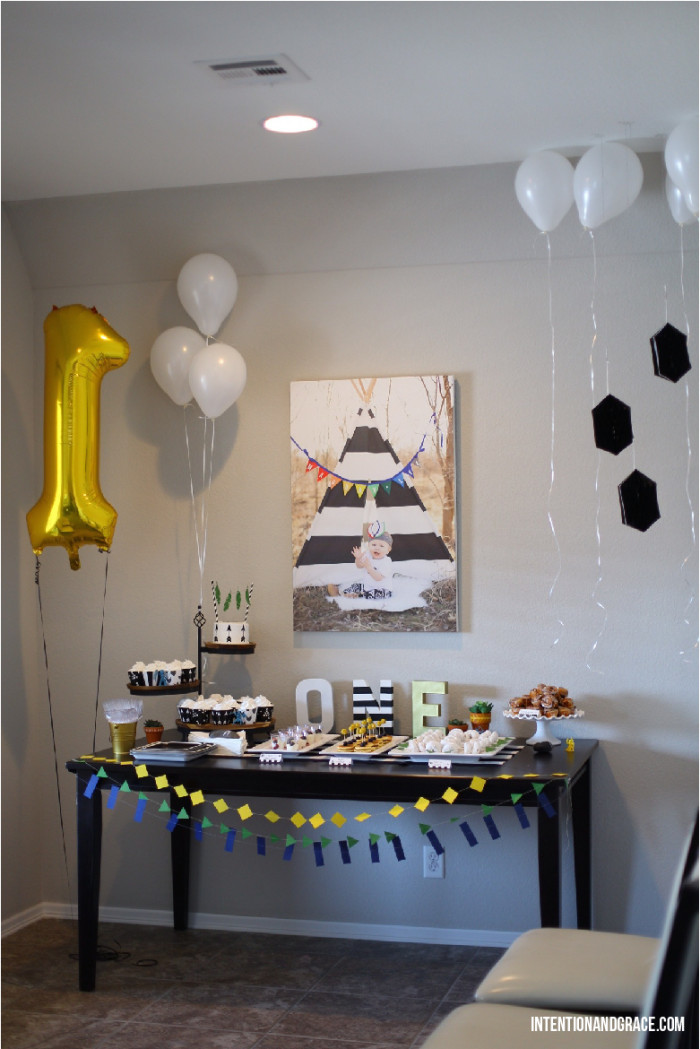
Our son turned one last Saturday and I wanted to share some photos from his Powwow themed first birthday party. I can not believe how fast one year can go! I know it is said all the time, but until you have a child of your own it is impossible to fully understand. I used to think first birthday parties were generally overdone considering the kids won’t remember them. But as the time neared to begin planning, I had so much love for this little guy that my craftiness and party-planning spirit was just bursting at the seams. So did I over do it? Maybe. But for me, it was so worth it.
To start our decor off we flipped our dining table around and pushed it against a wall to display the food in a festive and open way. This gave our guests a bit more room to grab a bite and chit chat when they arrived.
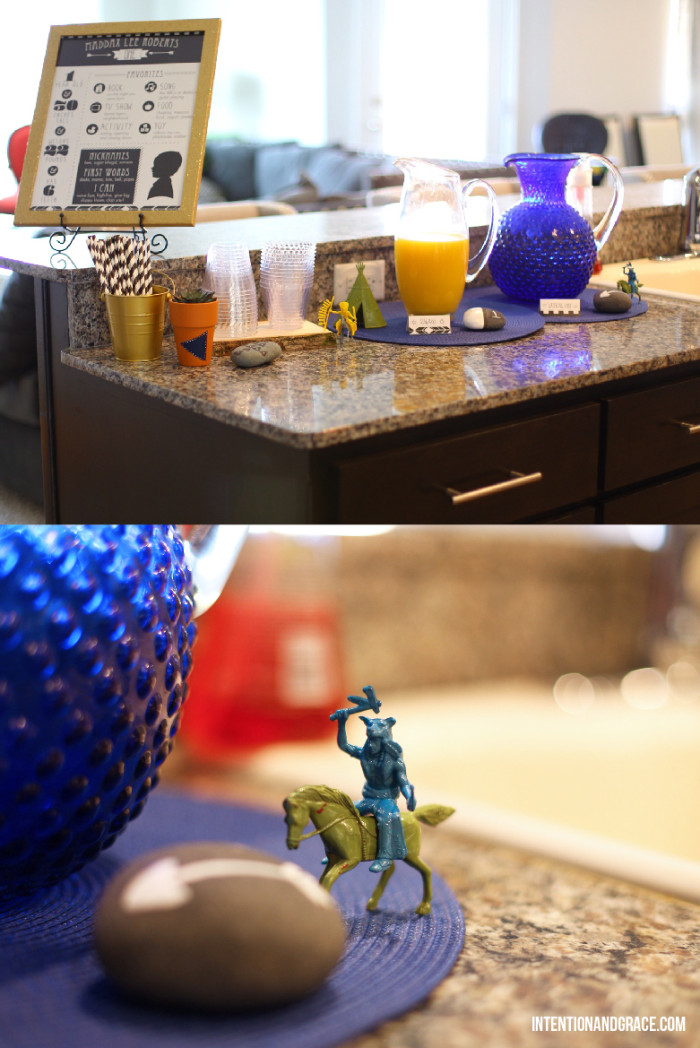
“Sun-rays” (orange juice) and water from the “Watering Hole” were served with some hors d’oeuvres style breakfast items.
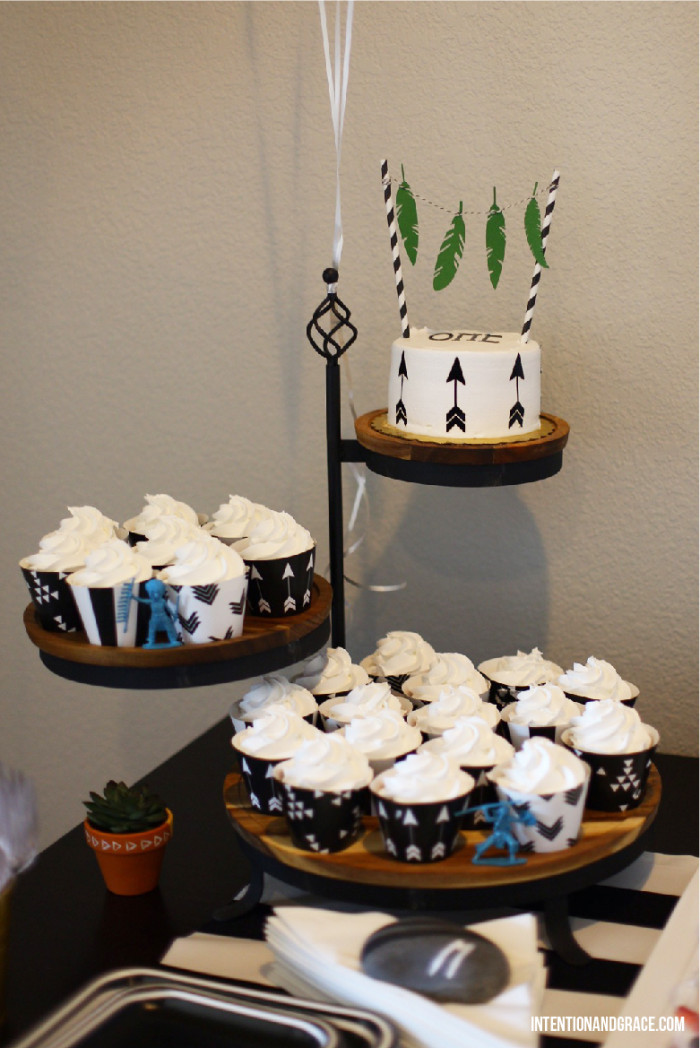
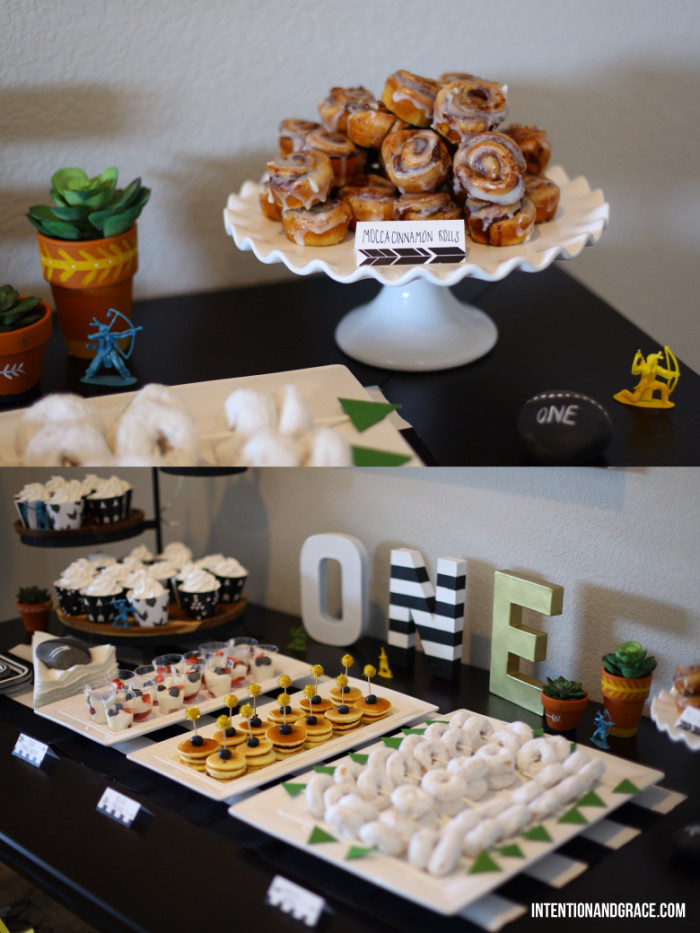
Maddax loves breakfast food so I knew I wanted to have a brunch style spread while also keeping it simple and easy, so we themed the spread around that using bite sized minis that the kids could also enjoy nibbling on. There were Mocca-Cinnamon Rolls, Yogurt Straight Shooters, Powwow Pancakes, and Powdered Arrows served along side some yummy cupcakes, juice and water. There was very little prep time for me so I could focus on making the presentation a bit more fun and I love how it all turned out!
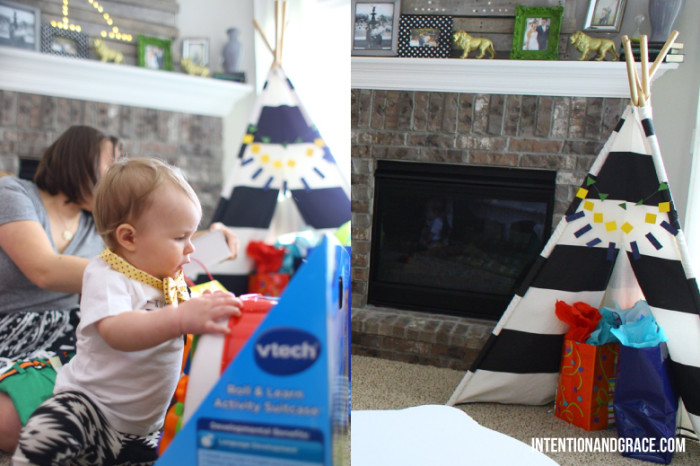
We pulled out our beautiful striped teepee from this kiddos bedroom and utilized it as the designated gift area until it was time to open presents.
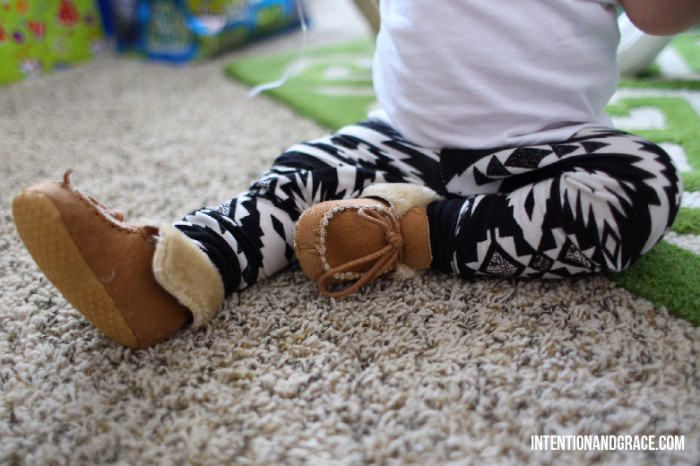
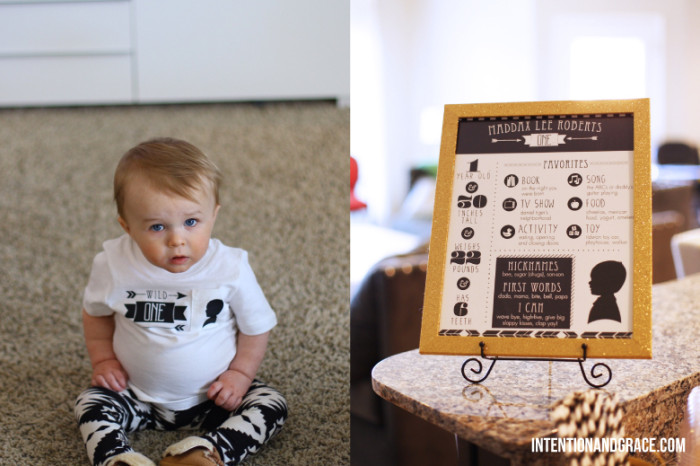
I got the most amazing leggings on Etsy and some Moccs on GroopDealz last fall that fit his birthday theme perfectly. For his shirt I used my Silhouette Cameo cutter (love!) to create a custom design and ironed it onto a white pocked t-shirt from Target. His little silhouette just fills me with joy.
We also framed a little infographic full of all things Maddax. His age, height, weight, and number of teeth. Favorite books, TV show, activity, song, food and toy. As well as his current nicknames, first words and some of the things he learned to do this year.
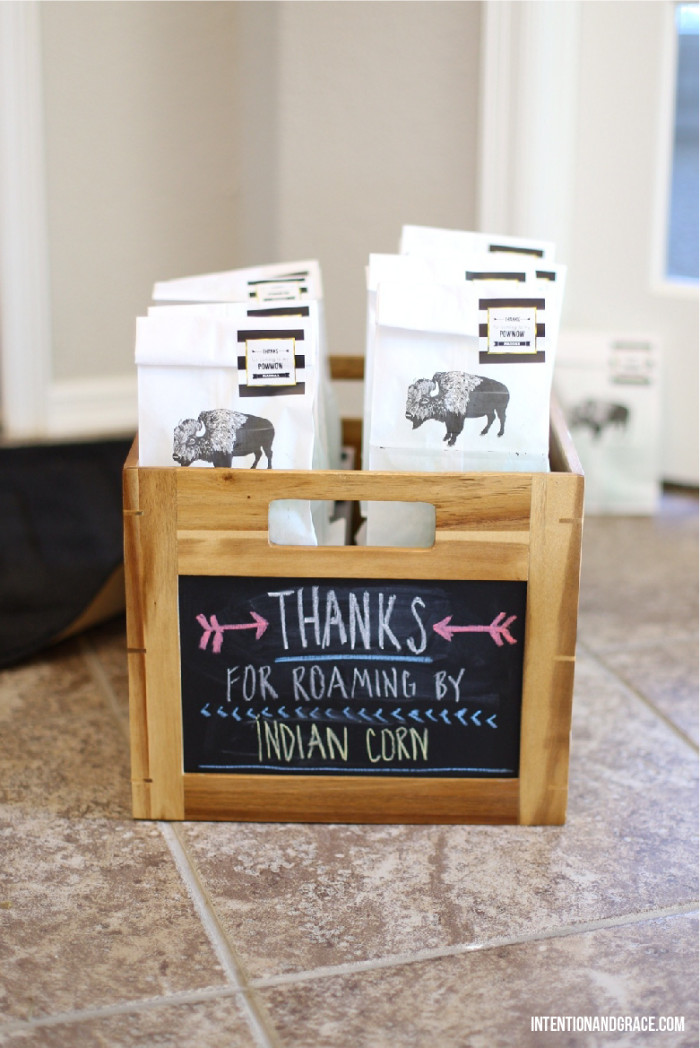
On the way out there were little goodie bags with “Indian Corn” (flavored popcorn) for guests to grab as they left. These were simple white paper lunch bags that I ran through the printer and printed buffalos on and sealed with some cute little stickers I got on sale for $5 online.
Our sweet little family was just overjoyed to celebrate the big O-N-E with so many of our loved ones. Thanks to all our friends and family for their love and support as we took on our first year of parenthood. We couldn’t feel more blessed or loved.

Apr. 2, 2014
Easter is just around the corner and has always been one of our families most celebrated holidays. Every year I can not wait to dye easter eggs and transform our home into a spring like atmosphere with tulips and bright colors all around. We are always trying to find new fun ways to decorate eggs, and these are just a few of my favorite ideas around the web this week:
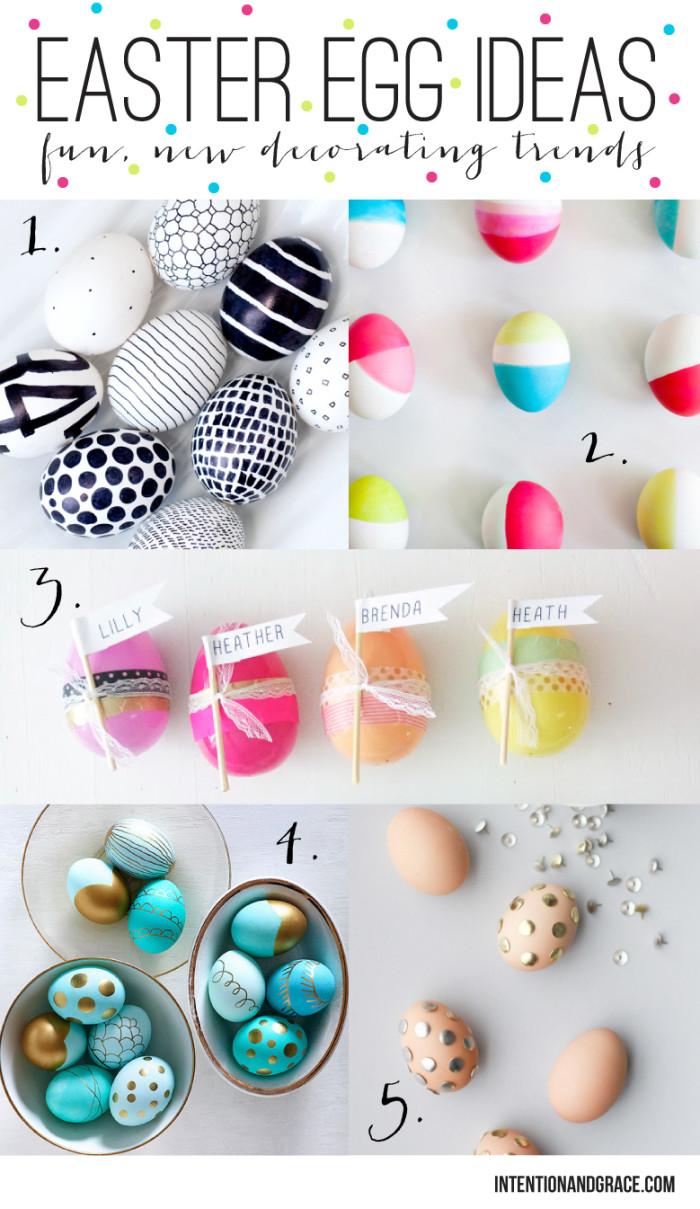
1. These adorable easter eggs from Obviously Sweet are so carefree and cute! And they don’t even require dying! Just grab a sharpie pen and doodle away.
2. Neon is so in right now! I’ve been seeing it everywhere lately and I love the super bright pop of color these awesome easter eggs from Oh Joy can bring to a room, while still keeping it clean and simple. The white gives the neon breathing room and simplicity, just my style.
3. With several rolls of washi tape hanging around our home, I jumped on an opportunity to use them on easter eggs. These plastic easter eggs from Oh My Little Dears wrapped with washi and ribbon are so cute for Sunday brunch place cards. They would also be a very easy project with the kids, no dye involved. ;)
4. Gold! We all know I love it, and these easter eggs from Better Homes had my heart at first glance. Simply dye some eggs a solid color or even leave them white for a very simple approach and grab a metallic sharpie pen. If you’re feeling adventurous you could even tape off a design or two and use it as a stencil.
5. I just couldn’t leave out these easter eggs from Paper & Stitch, they are genius! In no time you can take your hard boiled eggs from plain to fab with just a hand full of tacks!
Mar. 28, 2014
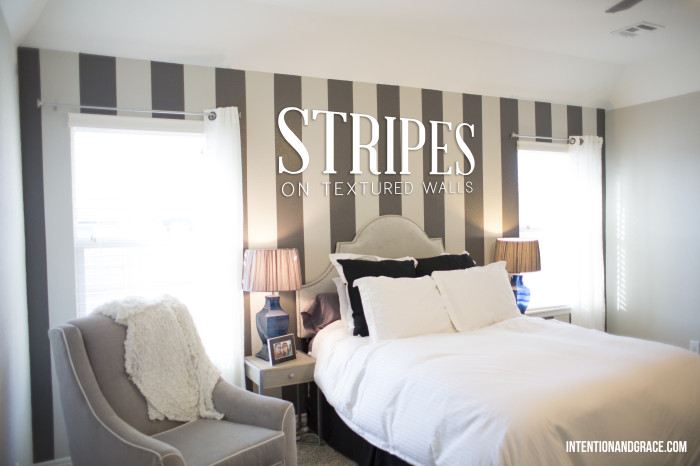
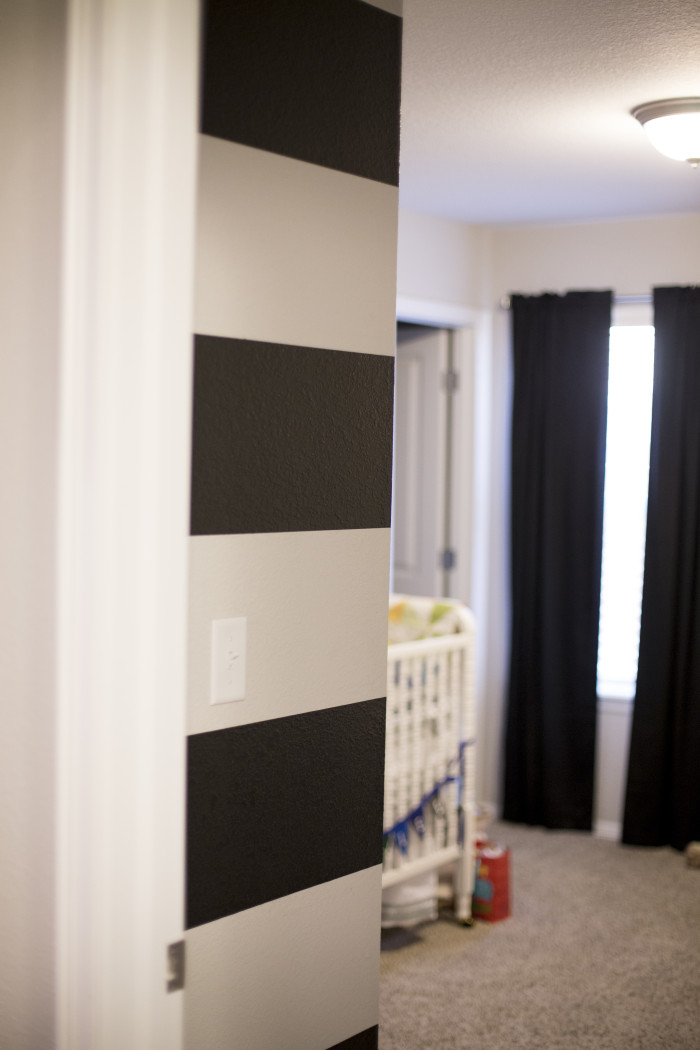
Geometric is everywhere right now, and I am really digging it! Whether styling for a fun party or adding a different kind of accent to a room, geometrics can bring a fun fresh vibe to any space. I’ve been finding myself drawn to them more and more lately and can’t wait to try a few of these fun DIYs this weekend. Those crates would be so perfect in my sons room! I love how something so raw and inexpensive can be spruced up and made so modern with a bit of black paint. From adding a simple triangle here and there to full blown 3D geo cubes, there are lots of options to go around. Here are 13 of my favorites from the web this week:
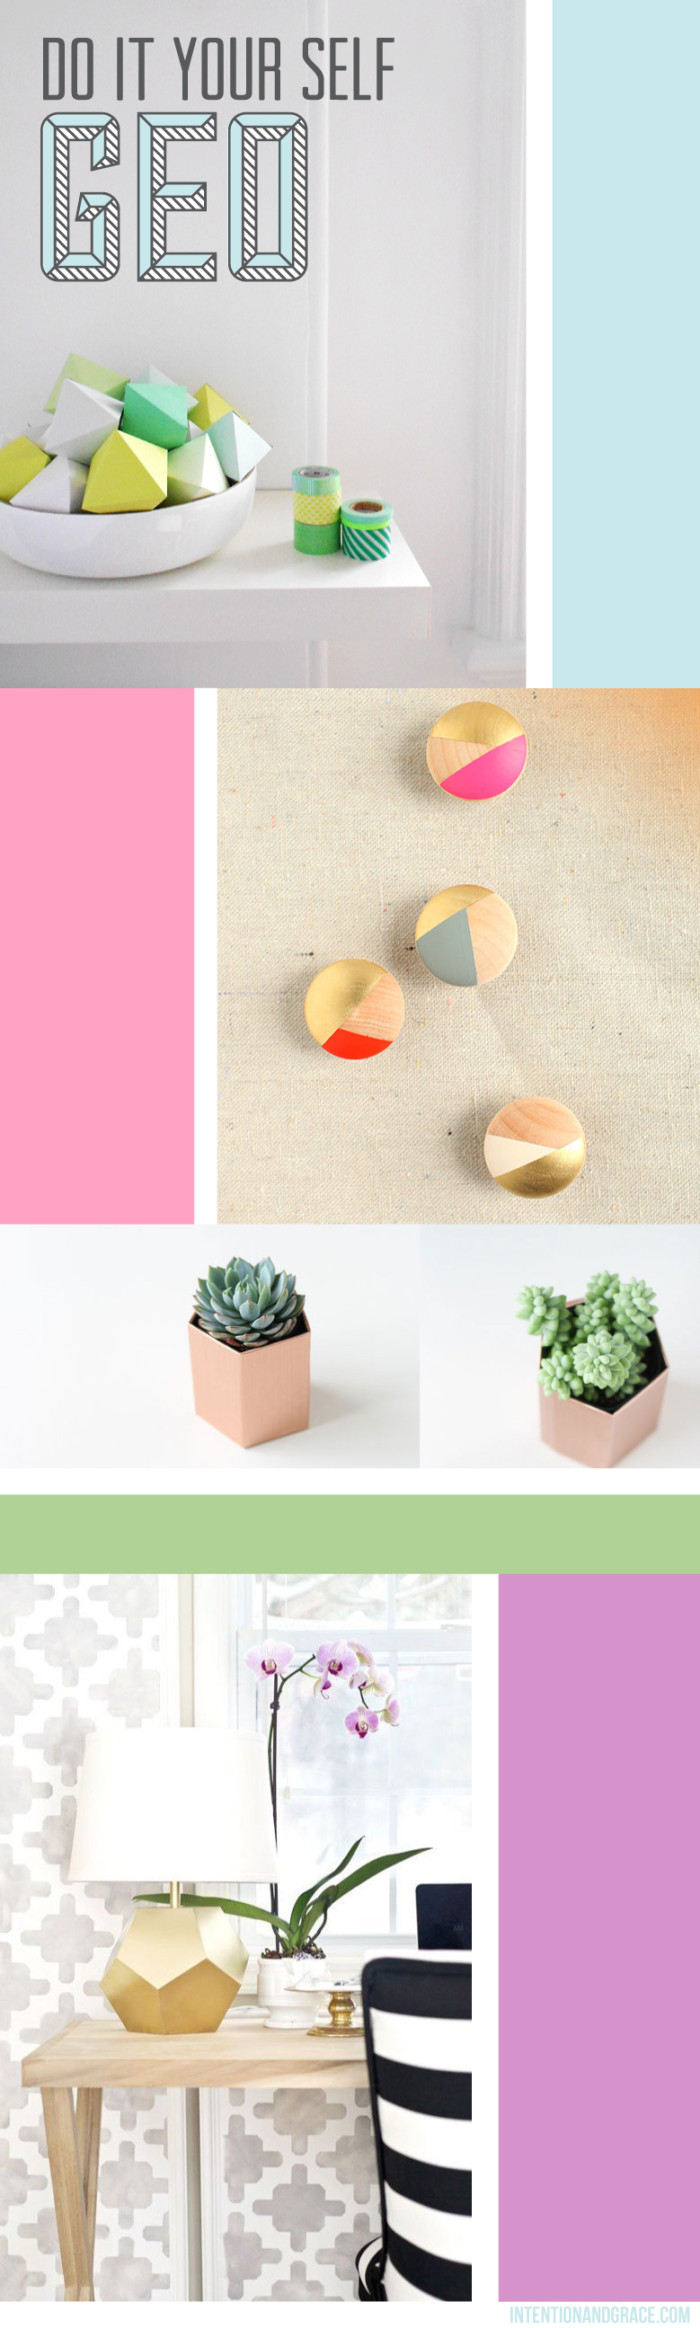
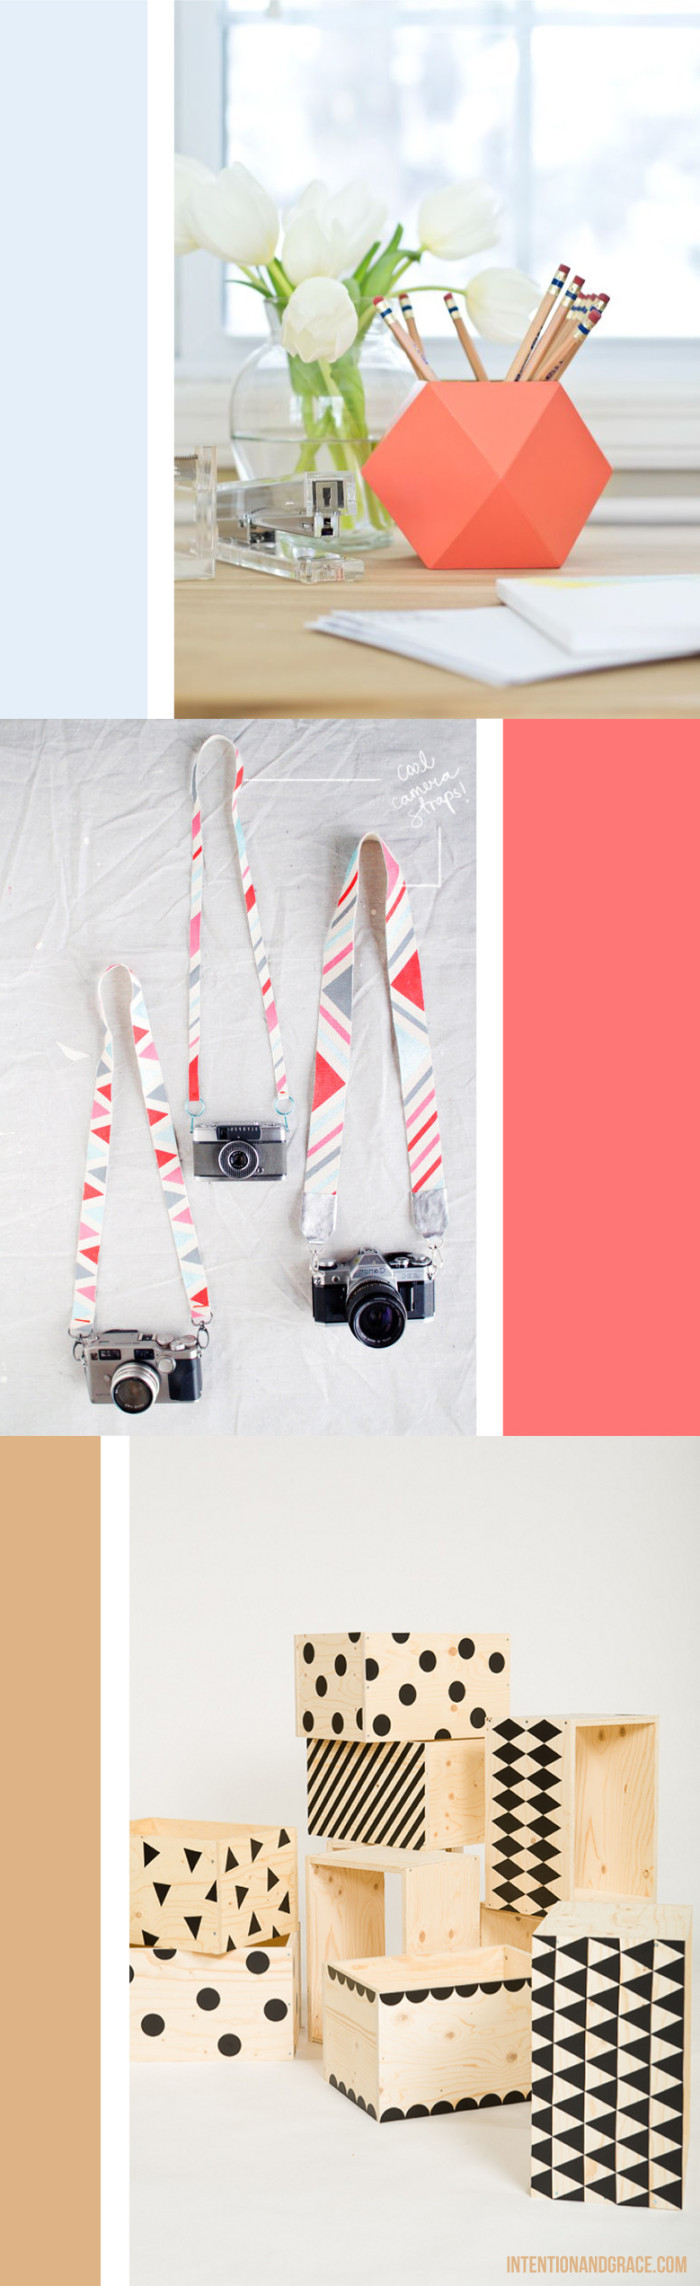
Geo Paper boxes | painted wooden drawer pulls | Copper succulent planters | gold lamp | coral pencil holder | painted camera straps | wooden storage crates
Incase these aren’t enough for you, I also have my eye on this amazing gold Geo Plant Hanger, this super simple and cute gold triangle garland, the cutest nursery mobile for any new little sweetie, this fabulous pair of hex and leather earrings, and this awesome wooden geometric cube pendant light.
Feb. 26, 2014
It has been too long since I have been posting regularly, opps. But I am finally back with a wonderful how-to and one of the many reasons I’ve been so busy lately.
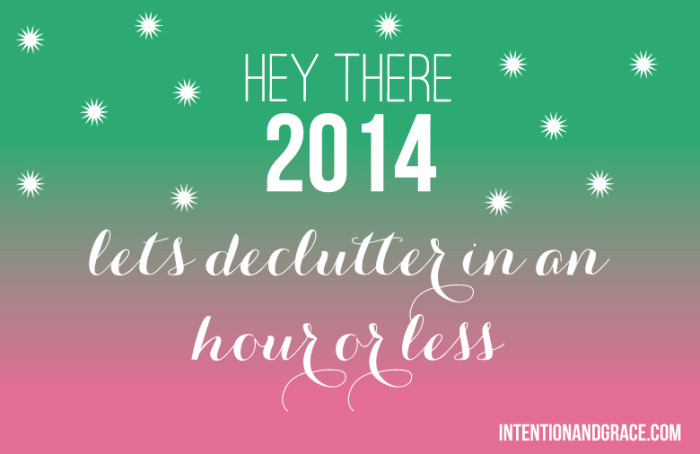
Now, if you know me at all, you know that I LOVE stripes. I wear them weekly, we have them all over our home, and they often appear in my designs. But ever since our house was completed last summer I have been dying to have some as an accent wall in our home. But with all of our walls being textured, it seemed like a very big, time consuming, tedious problem. Although I do have a generally steady hand, and perfectionist eye, I was not about to hand paint or touch up stripes on an entire wall. So I started doing some digging, and came across this amazing how-to.
So excited I could hardly contain it I grabbed a gallon of paint that weekend and the recommended tape in the post and got to work.
But did it work? Yes!
Well, eventually…
It all looked so easy, and the instructions were great, but after following all of the steps perfectly, I peeled off my tape with great expectations to see tons of bleeds all down the line. Bummer!
So with the help of my genius husband and a bit of trial and error here are a few notes I would add in case any of you are hoping to tackle a similar project.
First of all, I did really like the tape they recommended. It seemed slightly thinner than the regular blue or green tape and allowed me to press it down a bit easier, but overall I don’t think it is a deal breaker. By the time the process is complete you could probably get away with using just about any tape.
So, what caused mine to bleed and hers to look fabulous? Possibly difference in our wall textures, but most likely I think it was my assumption of how much paint was needed in the foam brush step (#4). I did everything just as she described, but boy were there gaps under my tape. Even with the finger pressing the tape did not adhere to the textured wall very well and sponging on the paint in what I considered a normal even coat offered no help. In order to really fill the gaps we followed steps 4-5, repeating this process 2-3 times per stripe, until the barrier of base paint color was extremely thick and completely filled any gap that you could see remained under the tape.
Once this step was done, I thought “Great! Hard part over, now I can just roll on my accent color and peel the tape!” Wrong.
In order to get really crisp lines I had to do the same technique with the foam brush as before, only this time covering over what I had just done with the accent color (dark gray). This time using a much lighter more even coating and constantly pulling outward from the stripe. I found that rolling the paint on opened up some of those gaps and it still bled through in some spots. We think the key here is really the outward motion of applying the paint away from the stripe, never pushing paint towards the tape line, but always moving it away from the line.
Finally, after several hours of measuring, taping, and dabbing on paint, I peeled the tape off while the paint was still wet and my lines were truly perfect!
I’m not saying all this to scare you away. I completed this project in 2 days, and it probably took about 10 or so hours to complete with all the trial and error, but every day when I walk into my bedroom and see our wall I am filled with joy and a smile on my face. It was all totally worth it.
And a couple weeks later I tried again on a much smaller wall with horizontal stripes in my sons room, and they came out perfectly crisp and things went much, much faster. I completed his wall in only a couple hours time following the above process and as I pass it every day I just love the accent.
We have since used this process for all painting, including trimming around our house, making all of our lines completely crisp and sharp, and it really is quicker and more efficient than getting out those pesky trim brushes and praying your hand is perfectly steady while you trim along the baseboards and ceiling.
Jan. 4, 2014
Okay guys, its officially a few days into 2014 and time for me to be intentional about organization and cleanup. Most people like to hold off until spring and have an annual Spring Cleaning, but I find it so refreshing to start the year off in a positive place. This year has flown by for us and had its share of both ups and downs, but Christmas break is over, we are back at work, and most of us are probably still dreading taking down the tree, lights, ornaments, etc. around the house.
I sucked it up and took down most of our inside decor before the New Year, even though I much preferred to be lazy and continue my holiday relaxing…But I still have a lot of organizing, and straitening up to do around the house to get my “problem areas” in check. Mainly because we moved into our new home this year and have been so busy that I have neglected organizing a couple areas. So when I stumbled across this amazing article on Better Homes and Gardens a few weeks ago, I knew I had to store it away for after the new year, because it’s pretty genius. I love how something that normally seems intimidating is made so simple by putting a 5-15 minute time limit on it. I know that not all of these tasks can be accomplished in that time frame, some will take less and some more, but it gives me a goal to visualize and some very practical ways to “start conquering clutter.”
Here are my favorites from the post that I’m sure to focus on this weekend:
Declutter the bathroom:
If you have 5 minutes: put away anything on the counter tops, and pull the shower curtain closed to conceal any bathtub clutter.
Declutter the pantry:
If you have 15 minutes: regroup food by item type. Toss anything that is expired. Wipe away any spills or dirt on shelves.
Declutter the closet:
If you have 5 minutes: Hang up clothes that are draped over your designated drop spot, such as on a chair. (This may take me 10 minutes… oops.)
Declutter the Refrigerator or Freezer:
If you have 15 minutes: Take a few minutes to assign spots using your fridge’s current contents to establish specific spots for foods you typically stock.
Declutter under the sink:
If you have 15 minutes: Keep the area neat by storing only one paper towel roll and tidy up each time you replace it. Old media caddies are the perfect size for movable kits filled with cleaners and scrubbing tools. Stash one beneath your sink so you’re ready for a quick clean. –I will need to completely take everything out of this area and restock with purpose. Right now things are sort of thrown about with no rhyme or reason making it very difficult to find the supply when needed.
A few of the items I have already knocked off my to-do list include taking down all of this years Christmas cards and filing them away in a 2013 folder. I love looking back at them each year, and this keeps them easily organized by year. We also packed away the Christmas decor in bins for weather proofing and easy storage. I got some at Target for $6 this year, they are red and green so I can easily spot them next year when its time to haul them out again. I hate having to play the holiday guessing game each year by opening and closing boxes to see what’s inside, so it was important for me to have them clearly labeled. We did the same thing with the halloween/fall decor also by putting them in black and orange bins.
So, I hope you join me in a little home cleanup, because it is more obtainable than you think. Happy New Year!

